
There are many criteria when it come to choosing the best external 3rd party library to include it in your project. Whether it is a personal or a professional project, Swift or Java, the following should apply every time.
Note: For the sake of this tutorial, I’m choosing Alamofire, which is an HTTP networking library written in Swift. Alamofire is considered to be one of the top Swift/iOS library for networking.
- Do your search: You know what you’re looking for, so start by searching the Internet for it. I know, this is obvious. But the point here is that don’t try to reinvent the wheel. There is almost a library for anything that you can think of nowadays, and this tutorial will help you narrow down your result to a couple. Example: Lets say I’m looking for a networking library for my next iOS project. I search for “Swift Network Library Github“. You might wonder why i followed my query with Github, well, as you may know Github is one of the biggest online code repositories out there, and most if not all developers place their library there. Also, adding the keyword Github will help eliminate any StackOverflow questions that might come up during the search.
- Analyze the results: You will notice that you’ve got a lot of results back. Now you need to analyze them based on some factors that will narrow them down. First thing to do is eliminate the noise, in other words, remove the irrelevant data/links that has nothing to do with what you want. For example, I’m searching for Swift, But i see in the results, even without clicking on the link that one of the results that came back is Objective-C library, so I won’t bother looking at it. But most of the time that would be so obvious, so you have to click on each results/link and quickly check out the README file or look at the code to make sure that it is the right programming language you want. Also, double check the language version number. For example, a lot of Swift library out there now are old ones, and they only support swift 2.3 or even older. In the case of Alamofire, I notice right away that it say Swift in the description in a big font, and under Requirements it lists Swift 3.1+ as the supported Swift version number. You will need to do the same for all the libraries that you found, I usually find what I’lm looking for in the first or second page of Google’s search results.
- Analyze each library: Now we have few libraries to pick from, lets start analyzing each one of them.
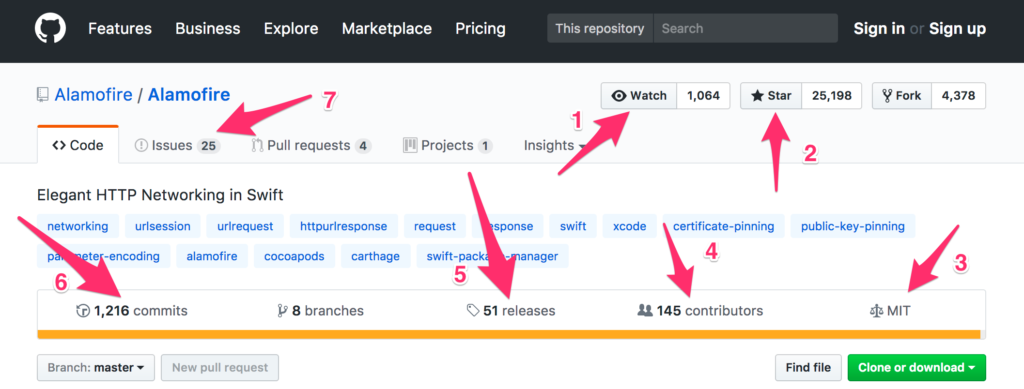
- Watch: The Watch number (#1 in the screenshot) represents how many people are watching the library and are interested in getting updates whenever the contributors (#4 in the screenshot) contribute to the library. This is great to stay up to date with the library.
- Number of Stars: Each star in Github (#2 in the screenshot) represents a person who is interested in this library. So obviously, the more stars a library has, the more popular it is. For example, Alamofire has 25k stars!
- License: Most of the libraries I’ve used in the past were under the MIT License (#3 in the screenshot). MIT License lets you use the library for commercial or private use and/or modify it or distribute it. The only thing that it doesn’t provide is a warranty of any kind nor liability. If you are considering a library for a commercial use, you might want to check with your lawyers or the legal department at your company to make sure everything is in order.
- Releases: The number of releases (#5 in the screenshot) identifies how many versions of this library have been published by the authors. Of course, the more releases the better. Since this indicates that the authors are always maintaining the library and publishing new versions (See #6 in screenshots for how many commits the authors did). It also shows that they are fixing the issues the developers report under Issues (#7 in the screenshot). Under each release, the authors list what they have added, fixed, modified. And sometimes a link to download that release. Since if you pull the library directly from GitHub you will get the latest and greatest version, but if you are looking for an older release then you need to check under Releases.
- Library Installation: There are different ways to install a library into your project. In iOS for example there are 4 different ways; Cocoapods, Carthage, Swift Package Manager, and Manually. If you are working with a team within a company, you might want to check with your team first as to what works best for the project. Also, if you are using any package manager already, you need to check that the library you are choosing supports that. Most of these information are located in the README file under the library’s Github page.
That is pretty much what you need to find the perfect library for your next project. If you have any comments, questions, concerns please let me know. As a bonus, below is a list of some awesome libraries that you will find helpful for your next project: