A lot of new developers are not sure about how to submit apps to AppStore Connect, or they assume that they have everything already and then they are surprised by all the required info they must have before they can submit their apps. Usually this happens when you are working with a client, project managers, or other parties and need specific info from them order to complete the AppStoreConnect app submission form and proceed with the release.
New App Submission
First, when you try to create a new app you will be prompted with the following screen, asking you to provide the following info:
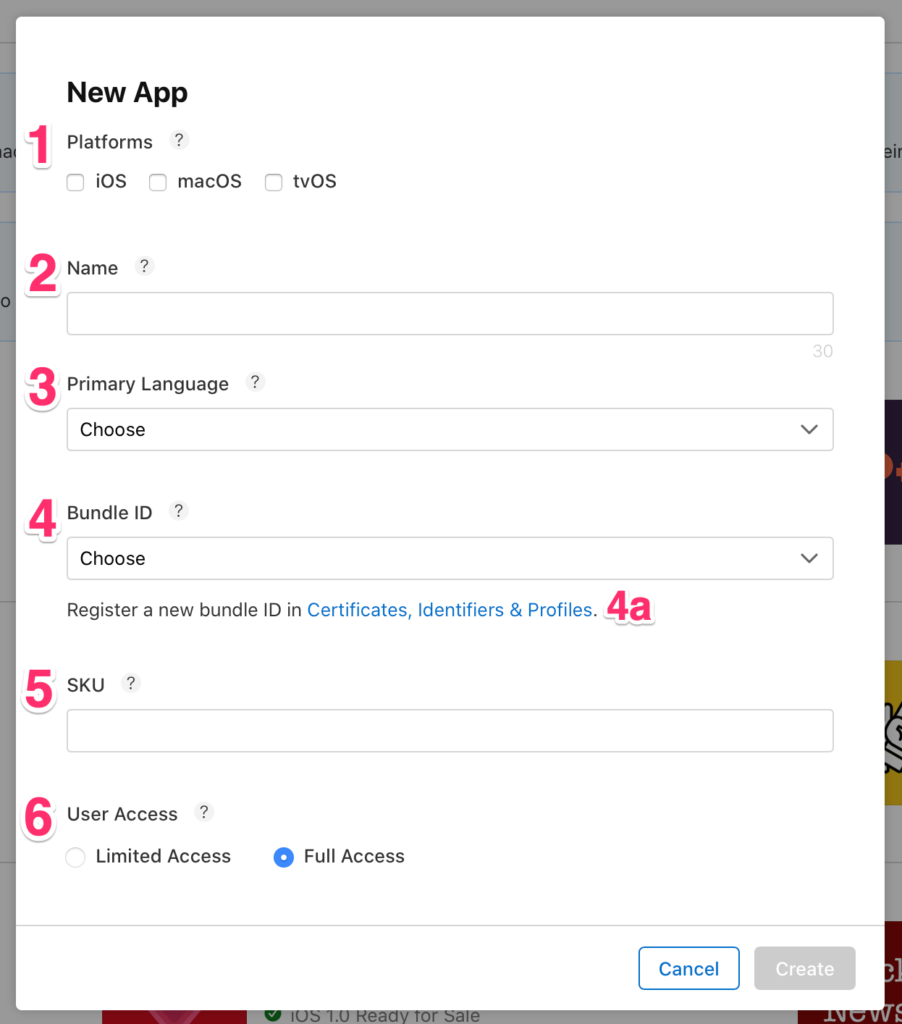
1- Platform: Which indicates where the app will be served. For example, iOS, macOS, or tvOS. You must choose one, but you can also choose them all if the app will support them.
2- Name (Max 30 characters): The app name is the name that will be displayed in the App Store. This is different that the app name displayed on the user phone. For example, if your app name is “Photo Editor”, you can submit it as “Photo Editor, a great app for editing photos”. This is a more descriptive name that will allow users to understand more about your app and what it does. While the name that will show up on the user device will be simply “Photo Editor”. Keep in mind that this can’t be longer than 30 characters.
3- Primary Language: Which as the name indicates, this is the primary language of your app. Your app can supports multiple languages, but this is the main one that the app will be using.
4- Bundle ID: This is a reverse-domain name style string that will be used to identify your app, whether in Xcode or in the AppStore. If you have not created one before, click on that link next to the bundle id field, indicated in the photo above as “4a”, which will take you to the Certificates, Identifiers & Profiles section to create a new one. You can follow my step-by-step post here on how to create a new identifier to the AppStore and how to configure it: https://kais.me/2020/09/how-to-create-an-app-identifier-in-appstore-connect-updated-for-ios-14/
5- SKU: The SKU, or stock-keeping unit, is used here to identify your app. You can come up with any string to identify your app. I usually use my initials-app-name. If you are building an app for a client you can use the company name, or possibly their stock ticker followed by the app name.
6- User Access: If you are a single developer using this developer account, and not part of any organization then you will always have Full Access selected and you can’t change it. But if you are part of an organization, then you specify which user roles gets permission to view, edit, or change the app info and see other details about the app, such as sales, downloads, or user reviews.
Now that you have filled up all the required info the Create button should be enabled, go ahead a click it. If your app name (#1 above) is unique and no other apps in the AppStore has it then you will be taken to the next screen (see screenshot below), otherwise you will be asked to change the name to something else. Developers are being creative with their app names where they add characters like a plus sign at the end of the name, or simply adding the word PRO to it.
Now that you have completed the first step of creating the app, you will see the following screenshot with overwhelming load of info and details. Don’t worry, it is easier than it looks.
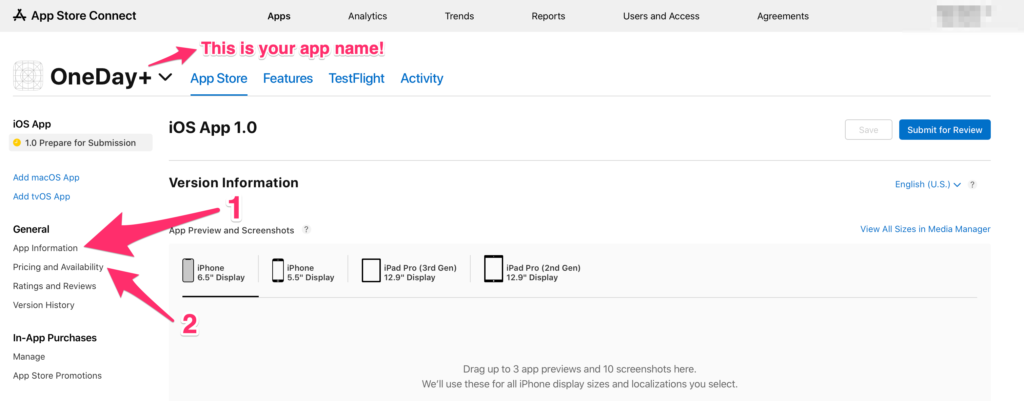
Go ahead and click on “App Information, #1 in the screenshot above, the first thing you will see is the App Information Section. This is where you can change the app name, if you want, add the privacy policy URL for your app, and add a subtitle.

1- Name (Max 30 characters): The app name is the name that will be displayed in the App Store (See the Name section above).
2- Subtitle: As of iOS 11, Apple introduced a new field called subtitle. This is used to provide users with a brief summary of your app that will appear under the app name on the App Store. For example; your app name could be “My Awesome Photo Editor”, and the subtitle is “Edit your photos with magic filters”.
3- Privacy Policy URL: This is the url for your privacy policy, or could be your client’s privacy policy document. It is required for all apps whether you are a solo engineer working on your own apps, or a 1 trillion dollar company. You can find a lot of sample privacy policy templates online that you can use to get ideas from on how to write yours.
The next section underneath the App Information is the General Information section where you see your Bundle ID, SKU, and other info as well. But the most important thing you have to do is setting up the app category (#1 in the screenshot below).
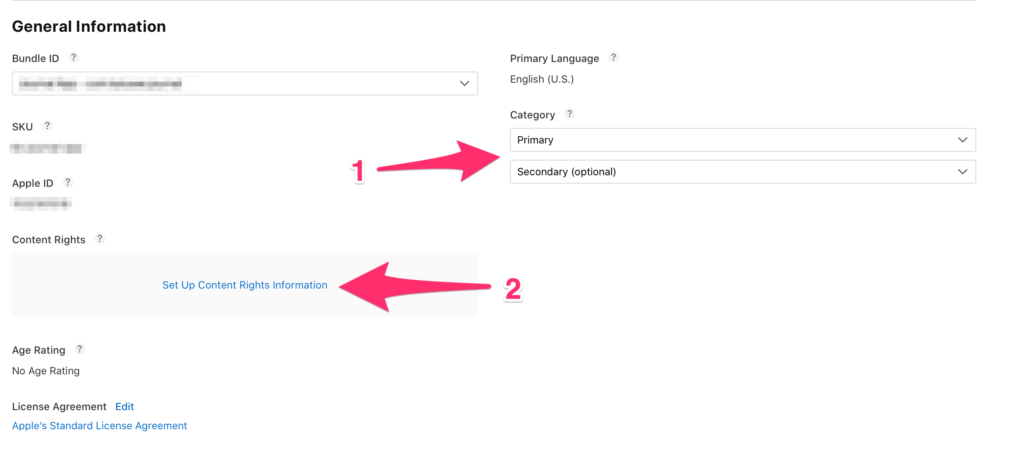
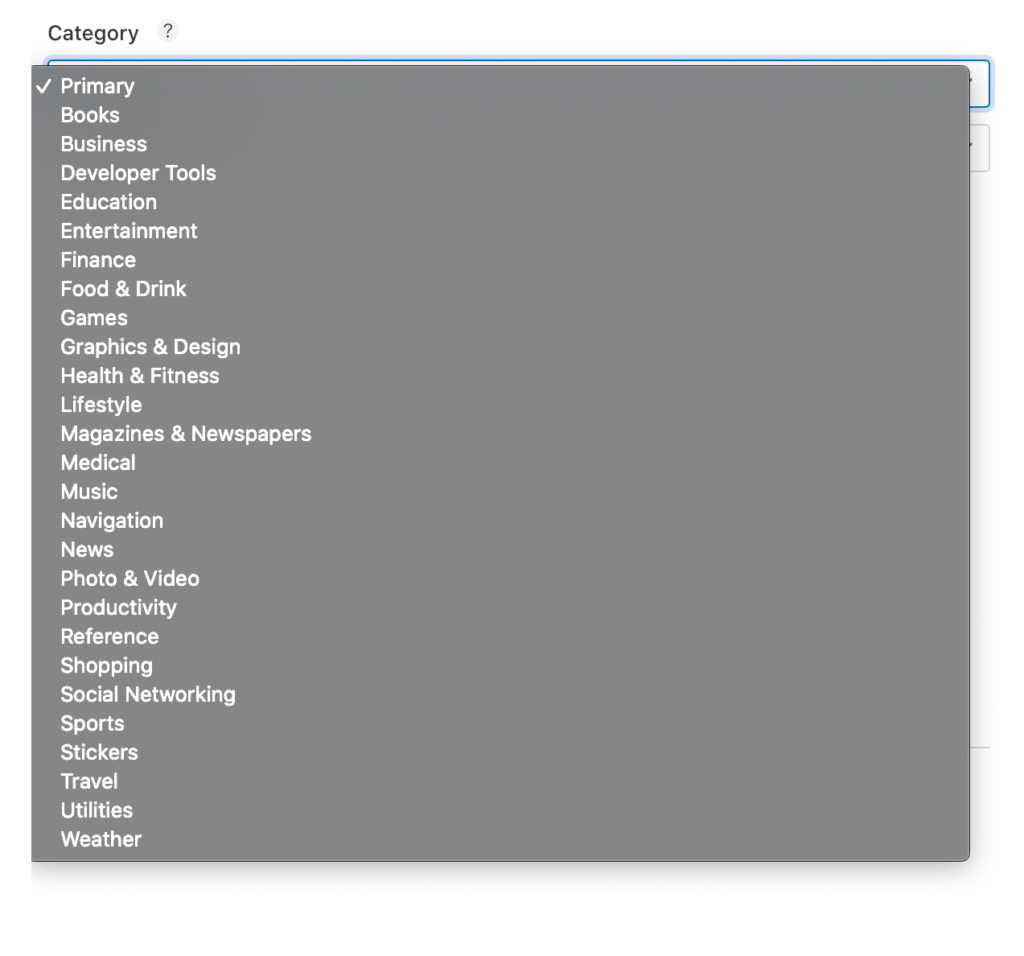
Clicking on the Primary or Secondary category will show the following list below, which contains the different categories of apps in the AppStore. Select the one that most suite your app, followed by an optional secondary category if needed. For example, a photo editing app will have a Primary category of “Photos & Videos” but it can also have a secondary category of “Utilities”.
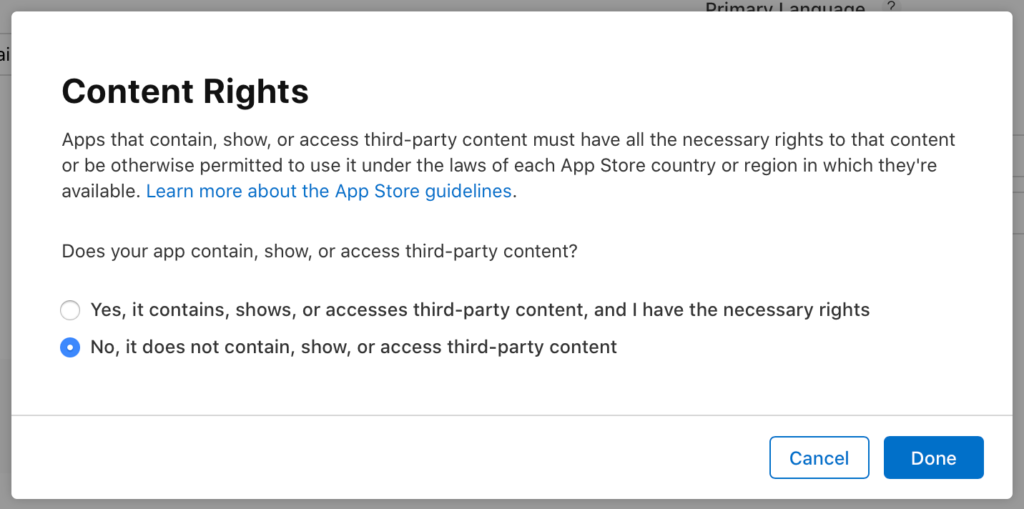
The second thing you have to take care of is setting up content rights information, #2 in the screenshot above. Clicking that will show the following screenshot where you have to specify your app contains, shows, or accesses any third-party info, and whether or not you have the right to do so.
After you filled out all the info, click that Save button on the top right corner of screen. Then head to the Pricing and Availability section located underneath App Information. Refer to #2 in the 2nd screenshot in this article.

The first thing to do here is to set a price for your app. Clicking on that price drop down will show you a list of prices ranging from 0 to 999.999 USD. Keep in mind that Apple’s cut is 30%.
The next sections are usually things that customizes the availability of your app, such as; pre-orders, in which countries the app is available, support for Mac apps, and distributions for businesses or education. In most cases you will leave those settings as is and you don’t have to change anything there.
Now, you are done with the general app information you need and you are ready to customize Version 1 of your app. Click on the version 1.0 section underneath your app name (see screenshot below).

The first section in this page is the app screenshots. The screenshots will be used in the AppStore to show the user how your app looks like. You can submit up to 10 images for each screen size. And for App previews, you can add up to 3, and they must be M4V, MP4, or MOV format and can’t exceed 500 MB.
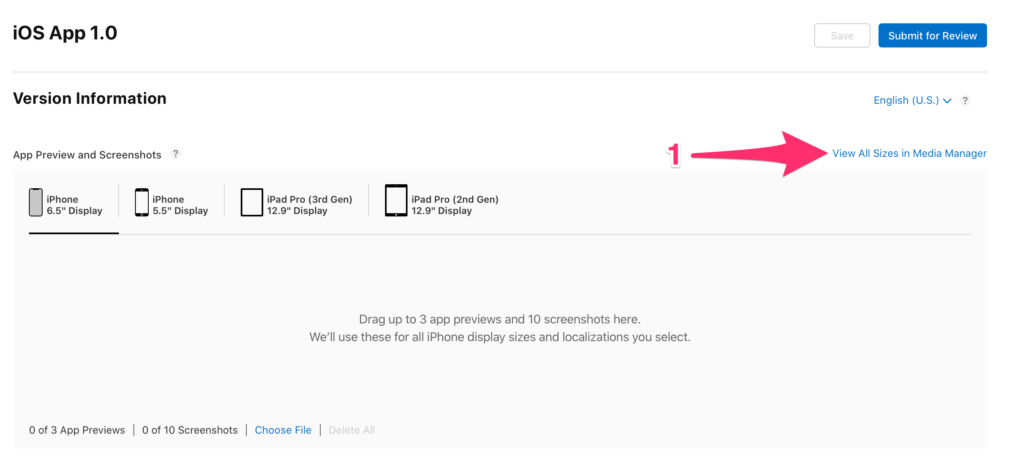
If you want to upload different photos for each specific device, or photos for other platforms like the Apple Watch or Messages, click on View all Sizes in Media Manager (#1 in the screenshot above).
For more info about sizes, formats, and other specs refer to the following AppStore documentation here: http://help.apple.com/itunes-connect/developer/#/dev910472ff2
Underneath the screenshot you get multiple fields to fill out about current version, and they get transferred from one version to the other, so don’t worry, you don’t have fill those out with every version. The only thing that you have to worry about when submitting an update to your app is the What’s New section which will be covered later in this post.

1- Promotional Text (Max 170 characters): This will let you inform your users about any app features without having to release a new app submission. This text will appear above your app description in the App Store.
2- App Description (Max 4000 characters): A description of your app, like what it does and what features it has. This is a very important part so you have to be very careful and precise. Despite that you have 4000 character limit, its always important to make it short and meaningful.
3- Keywords (Max 100 characters): Keywords are very important part of the app submission process. It is one of the ways that your app will be found in the AppStore. You have 100 characters to make up your keywords, so choose carefully. Note that your keywords can use one or more words separated by a comma.
4- Support URL: This is, as the name indicates, the url that people can visit if they have questions about your app or want to report a bug.
5- Marketing URL (Optional): This could be your marketing page for your app on your website, or a link to your client’s main website.
The next 3 sections include other additions you can include in your app (see screenshot below). Of course, all of these are optionals and you don’t have to add them if your app doesn’t support them.
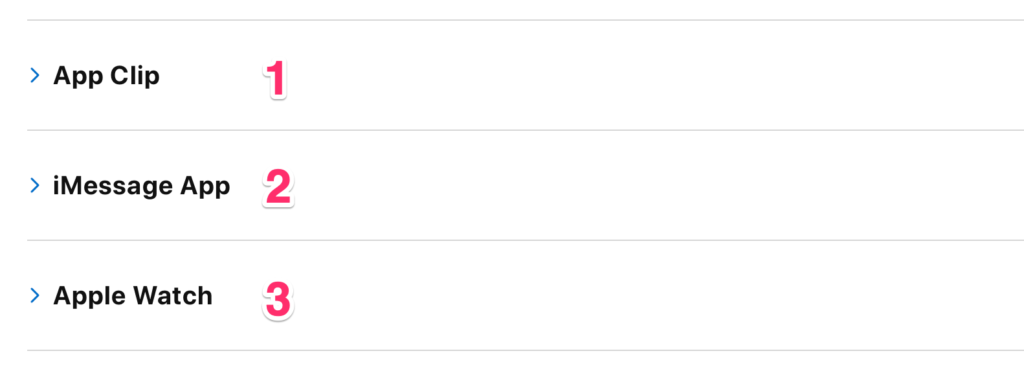
1- App Clip: This is something Apple introduced as part of iOS 14. It is basically a mini version of your app that can be used without having to download the full version. To learn more about App Clips visit this link: https://developer.apple.com/app-clips/
2- iMessage App: An iMessage app can be a companion app to your native app or a standalone app by itself. To learn more about how to create one, visit my post here: https://kais.me/2017/10/create-a-stickers-app-for-imessage/
3- Apple Watch: If you have an Apple Watch app with your app, you can add its screenshots in this section.
The following section is the Build section, #1 in the screenshot blow. This is where your build will show up after you upload it in Xcode. Then you have to select it and attach it to current app version you are about to submit.
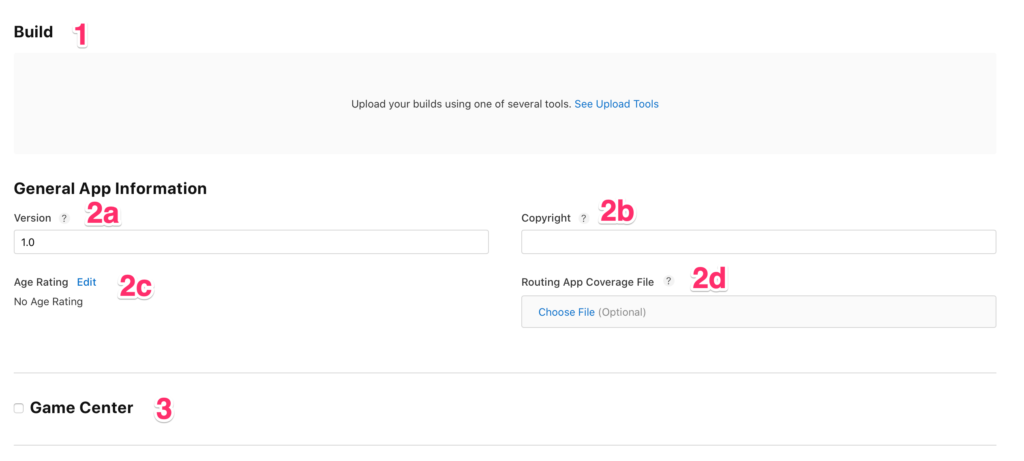
After that, you have to fill out the General App Information section which contains the following:
2a- Version: Usually when you are submitting your first app the version number will be 1.0, unless you have other reasons not to. Then after the first release, the practice is to increment the version number by 0.1 for minor releases, and by 1 if you are doing a major release.
2b- Copyright: “The name of the person or entity that owns the exclusive rights to your app, preceded by the year the rights were obtained (for example, “2008 Acme Inc.”). Do not provide a URL.” – AppStoreConnect
2c- App Rating: Clicking Edit next to the App Ratings fields opens up a dialog box where you can specify what your app has that could prevent it from being a kids-friendly app or restrict it in certain country. This could include things like; Unrestricted Web Access, Profanity, Violence, Nudity … etc. If you select No/None for all items then your app will be rated as “Ages 4+”.
2d- Routing App Coverage File (Optional): “Specify the geographic regions supported by your app. The file must be in the .geojson format and can only contain one MultiPolygon element. Learn More” – AppStoreConnect
3- Game Center: Check this box if your app is a game and you are using Game Center.
Then you have to fill out the App Review Information which includes details on how the AppStore review team can review your app and the information they will need.
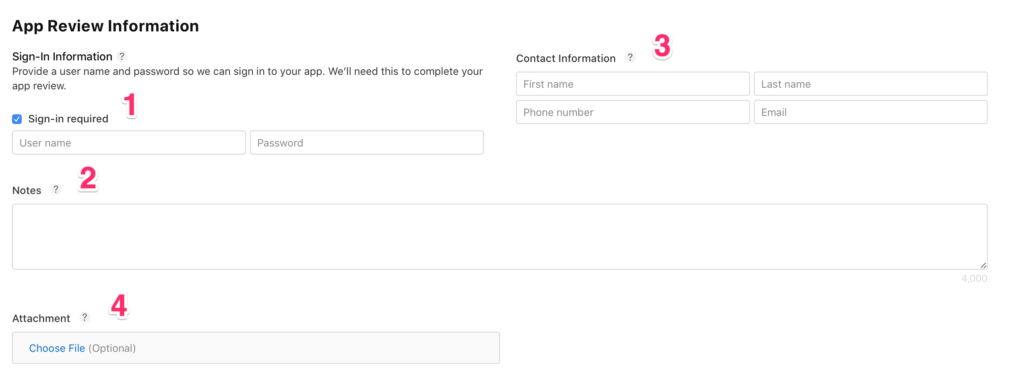
1- Sign-in required: If your app requires login, Apple asks the developer to add a testing account for them to be able to login into the app. If you app has a login and you don’t provide this info, your app will be rejected. If you don’t have a login, then simply uncheck that checkbox.
2- Notes: You can add additional notes to help the app reviewer navigate your app. Don’t include things like “Don’t do this” or “Don’t tap on this button”.
3- Contact Info: This is a general contact info form, details such as you or your clients info, address, phone number and email in case Apple wanted to contact you about something regarding the app.
4- Attachments: “You can attach specific app documentation, demo videos, and other items to help prevent delays during the app review process” – AppStoreConnect
The next section discusses how you want to release your app. Whether you want to manually or automatically release it. And the section after that asks if the app uses any advertising identifiers.
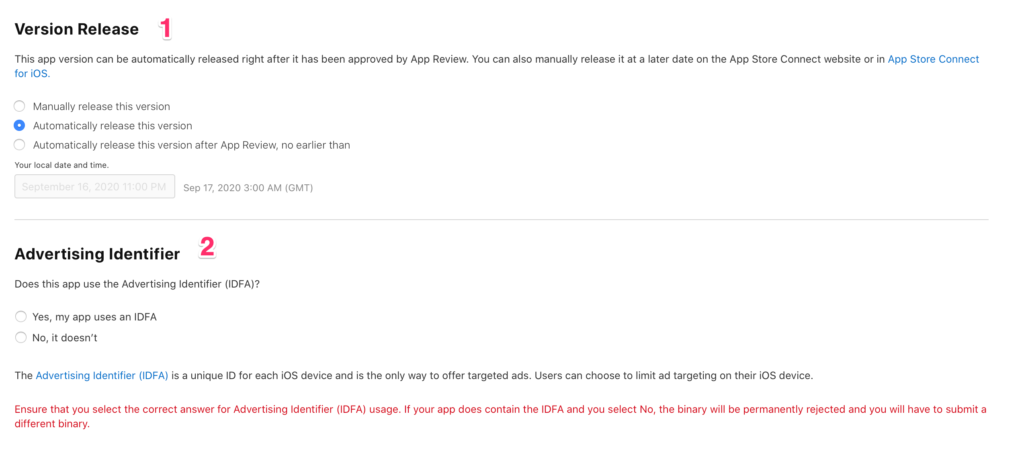
1- Version Release: You can set to your app to go live as soon as its approved by Apple. Or if you want you can also set a date that it will go live by if it was approved by then. Another option is to manually release the app after it was approved. This is beneficial if you submit the app while your team is doing a regression testing, then if bugs found you don’t have to release, but if none were found then you saved 2 days or so waiting for Apple to approve the app.
2- Advertising Identifier: If you use any advertising identifiers in your app, or your app serves ads that uses that then you need to specify that here. To learn more about that you can visit the following link: https://developer.apple.com/library/ios/documentation/AdSupport/Reference/ASIdentifierManager_Ref/ASIdentifierManager.html
That is everything you need to submit a new app to the AppStore in iOS 14. Now if you want to submit an updated version afterwards, continue reading.
New Version Submission
When you want to submit an update to your app, you will need the following information:

1- Version Information / What’s New in This Version (Max 4000 characters): In this section you can describe what is new in this release, such as added new features or bug fixes. This is not required for new apps.
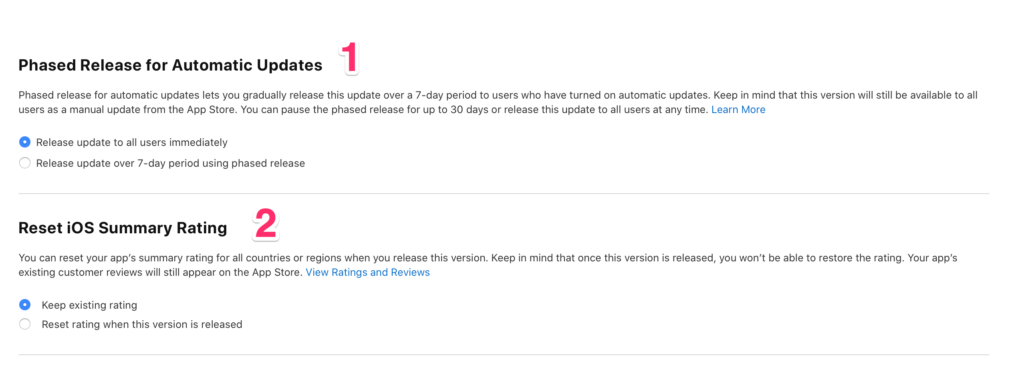
1- Phased Release for Automatic Updates: This feature allows developers to release their apps in batches. Basically, once the app gets approved, it will be released to users gradually over 7-day period. This is helpful if you are releasing a new or big feature, and want to make sure that there are no bugs or issues when it gets released to a large number of users.
2- Reset iOS Summary Rating: “You can reset your app’s summary rating for all countries or regions when you release this version. Keep in mind that once this version is released, you won’t be able to restore the rating. Your app’s existing customer reviews will still appear on the App Store” – AppStoreConnect
Enterprise Distribution
If you are submitting an in-House App (Enterprise Distribution), check out my post below. https://kais.me/apple-developer-enterprise-program-setup/
Thank you for reading this post, if you have any questions please feel free to leave a comment!
Thanks! -Kais
1 thought on “iOS 14 App Submission Checklist – How To Submit an app to AppStore Connect”