The Xcode simulator is the developer’s friend across their iOS development journey. Without it, debugging applications has to always happen on device which is time consuming and a lot of times it doesn’t work and you would have to debug why your device, which is connected, is appearing to be not connected to Xcode.
In this post I will cover some of my favorite tips and tricks that I use on daily basis building iOS applications and running them on the simulator.
1. Resetting the Simulator
While developing your app you might notice some issues running it on the simulator, or you want to start with a fresh device to erase any stored data on device. To do that, you can easily erase all simulator content by going to the simulator “Device” menu and selecting “Erase All Content and Settings“. This will prompt you with an alert to confirm and once you agree the simulator will restart into a new and fresh simulator.
2. Remove Unwanted Default Apps
The simulator comes with few default apps that you might not need. Thanks to the new App Gallery now you can remove the default applications from your home screen and leave only your apps or the ones that you interact with, maybe like Safari. To do that, simply tap and hold on any default app till the context menu appears, then select “Remove App“, then you will be prompted to confirm and after that the app lives only in the App Gallery and you won’t have to deal with it again on the home screen. You can achieve the same if you tap and hold on any empty space on your home screen till the apps starts to “wiggle” then you can remove multiple apps at the same time by tapping the “X” icon on top of each app similar to what you do on your iPhone if you were to delete an app.
3. Useful Keyboard Shortcuts
There are many useful keyboard shortcuts that reflects hidden commands in the simulator menus. Below is a list of the most useful ones that I use all the time.
- CMD + SHIFT + A : To toggle the appearance of the device and app to light or dark mode. This is very handy rather than digging into the Features menu then selecting that option.
- CMD + R : This will start recording a screen capture of your simulator (i.e. video capture). This is useful if you want to send a video of your app to someone or upload it to AppStore Connect to be displayed on your app page. More on this feature below.
- CMD + S : Similar to the shortcut above, but this one only captures a static screenshot of the current simulator screen. Again, this can be useful to upload screenshots for the AppStore Connect app page. Please note that if you don’t interact with the thumbnail that appears once you save a screenshot then it will automatically be saved to your desktop.
- CMD + CTL + C : If you don’t want to save the screenshot as a file and rather just want a quick copy of what is currently on the simulator screen then this shortcut is the way to do it. This will basically save a copy of the screenshot to your clipboard and you can paste it anywhere you’d like without having to deal with image files.
- CMD + Left/Right Arrow : This keyboard shortcut will allow you to rotate your simulator in landscape mode and back to portrait mode. This is especially handy if you are debugging your app on the iPad simulator.
- CMD + CTL + Z : This shortcut will simulate shaking the device. In one of the apps I’m working on we added a debug mode that can be launched by shaking the device, and on the simulator this keyboard shortcut has been very handy.
- CMD + K : This shortcut will show/hide the keyboard while a textField/textArea is in focus. This can be useful if you want to debug using the simulator keyboard or checking the keyboard type for certain textFields.
- CMD + CTL + -/+ : If your app supports dynamic font size then you’re always checking the app layout in different font sizes. This shortcut will allow you to increase/decrease the app font size quickly without having to go through accessibility menus or Xcode debug menu.
- CMD + 1/2/3/4: This will allow you to change the simulator window size on screen. CMD + 4 is fit screen which is the one I use the most if I had to change the simulator window size manually.
- CMD + SHIFT + H : This shortcuts is for pressing the Home button on swiping up on your iPhone.
- CMD + L : This shortcut is for locking and unlocking the simulator
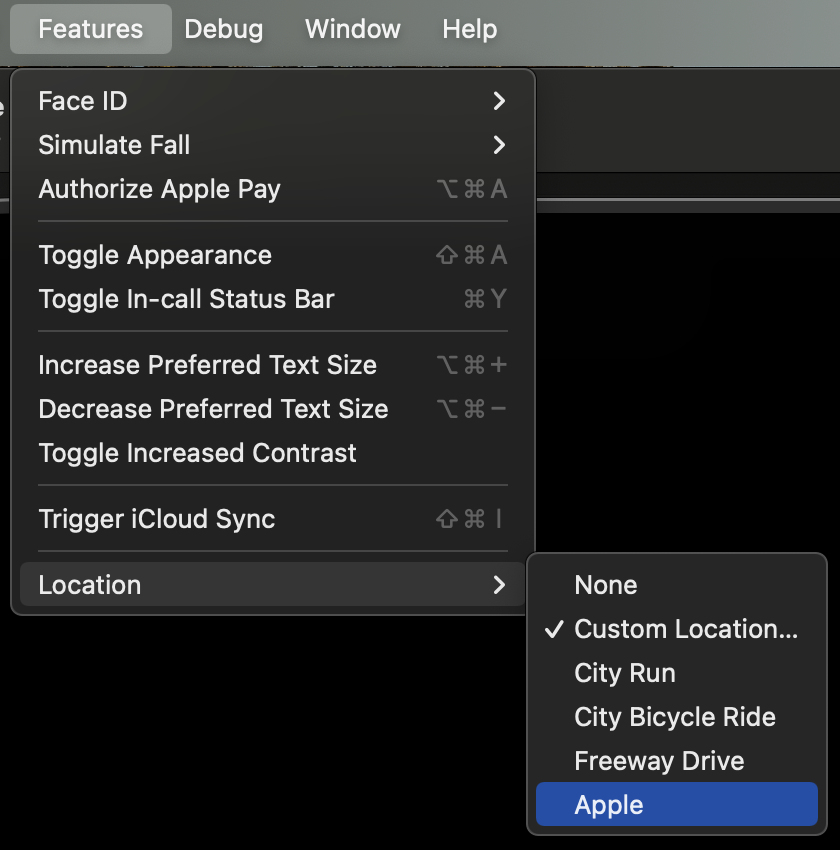
4. Simulating User Location
Many applications relies on user’s location such as weather apps, navigation apps … etc. If you app uses that functionality then you need a way to simulate different locations while debugging your app. While you can test that functionality by running the app on your physical device and driving around, you can simply achieve the same thing in the simulator.
Under the “Features” select “Location” and then you can select different options based on what you would like to test. The simulator gives you different options such as Apple’s HQ location in Cupertino, CA, a Freeway Drive, Bike Ride or a Custom Location. See screenshot below.
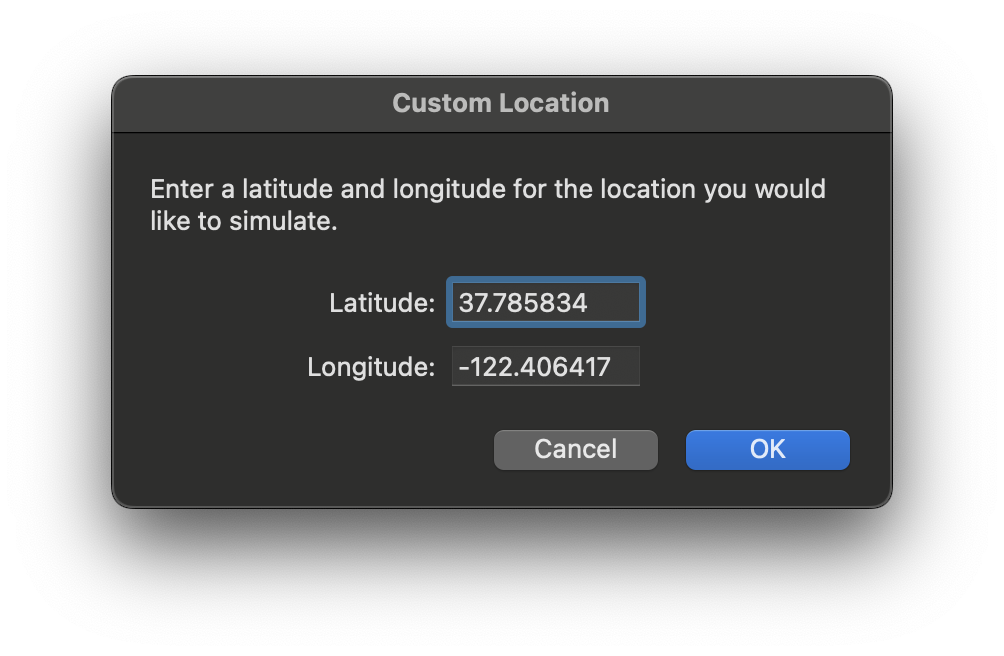
The Custom Location is very handy where you can actually specify a certain location to simulate. Select that option will trigger dialog, see screenshot below, which asks you to enter a valid location latitude and longitude.
5. Slow Animation
You might wonder why you need to enable slow animation on your simulator. Well, sometimes when you’re building certain custom animations that are quick you can’t capture how they’re looking, or sometimes a weird behavior is happening too quickly that you can’t catch it so you need to slow things down a bit and take a closer look.
To enable that, go to the “Debug” menu and select the first option “Slow Animation“. Then launch you’re app in the slow mode and enjoy debugging. Below is a quick GIF of that will look like. Please note that this option will apply to the whole simulator and not only your app.
6. Supporting Drag and Drop
If you want to add new photos for example to the simulator Photos app, you can easily drag these photos from your Finder on your mac directly into the simulator, which will open them right into the Photo apps and then you can use them however you want. The same thing can be applied to other file formats like text files, certificates, and more.
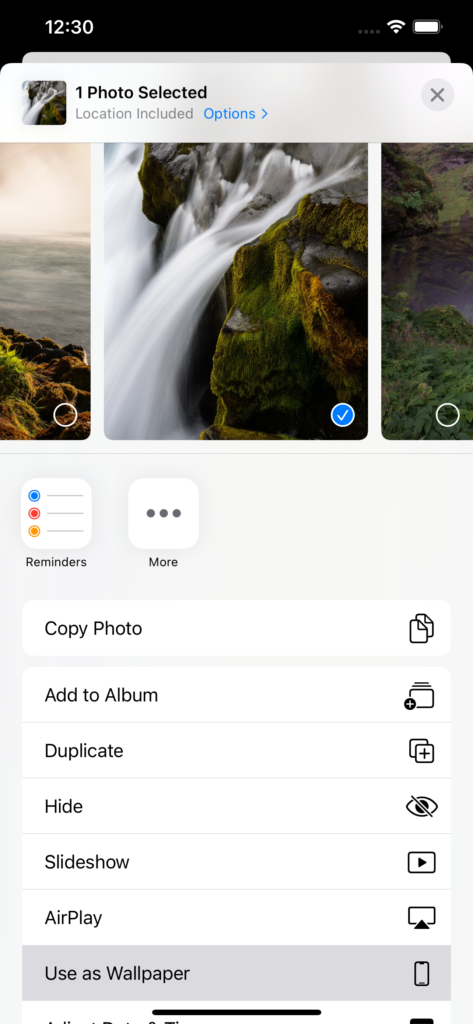
7. Changing the Wallpaper
This might be a bit trivial but you can actually change the simulator wallpaper if you’re tired of looking at the same default wallpaper all the time. While changing the wallpaper is available as an option on the iPhone in the Settings, it is not available on the simulator. So in order to do that, you have to go to the Photos app, select the photo you want, then tap the share icon then “Use as Wallpaper“. And as mentioned in the previous tip, you can drag and drop any photo you’d like to be the wallpaper into the simulator easily.
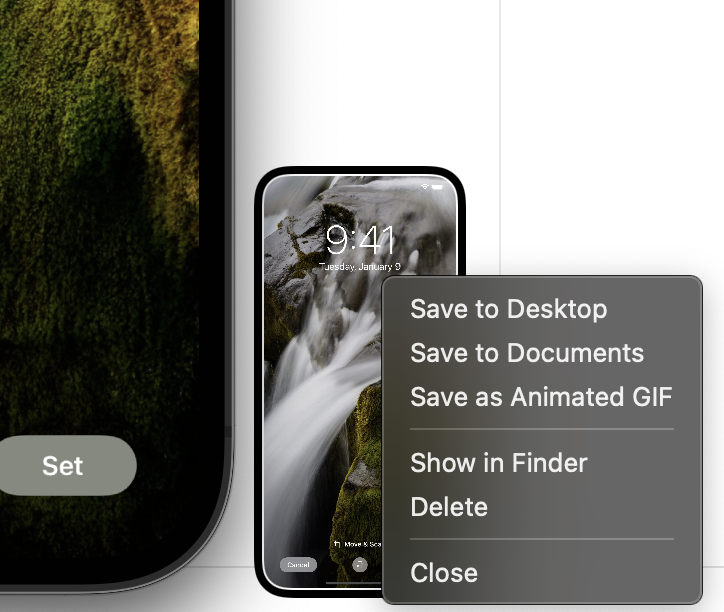
8. CMD + R Options
As mentioned in Useful Keyboard Shortcuts above, CMD + R will start recording the screen of your simulator and will output a video stored on your desktop.
While your simulator is recording, you will notice that the screenshot icon on the simulator bar has changed to a blue Stop recording icon (See screenshot below). Clicking on that will stop the recording and then you will see the recording thumbnail appear to the lower right corner of the simulator.

After recording has stopped, you can right click on the thumbnail to select where to save a video or you can save it as a Animated GIF image if you prefer (See the Screenshot below.). You can also control the size of the GIF, and some optimization options by going to the simulator Preferences.
9. Simulator Preferences
I’m not sure how many developers have tinkered with the simulator preferences, but for me personally I have only recently started to change some things to adjust to my needs. There are few useful settings under there that you can toggle based on your needs. For example:
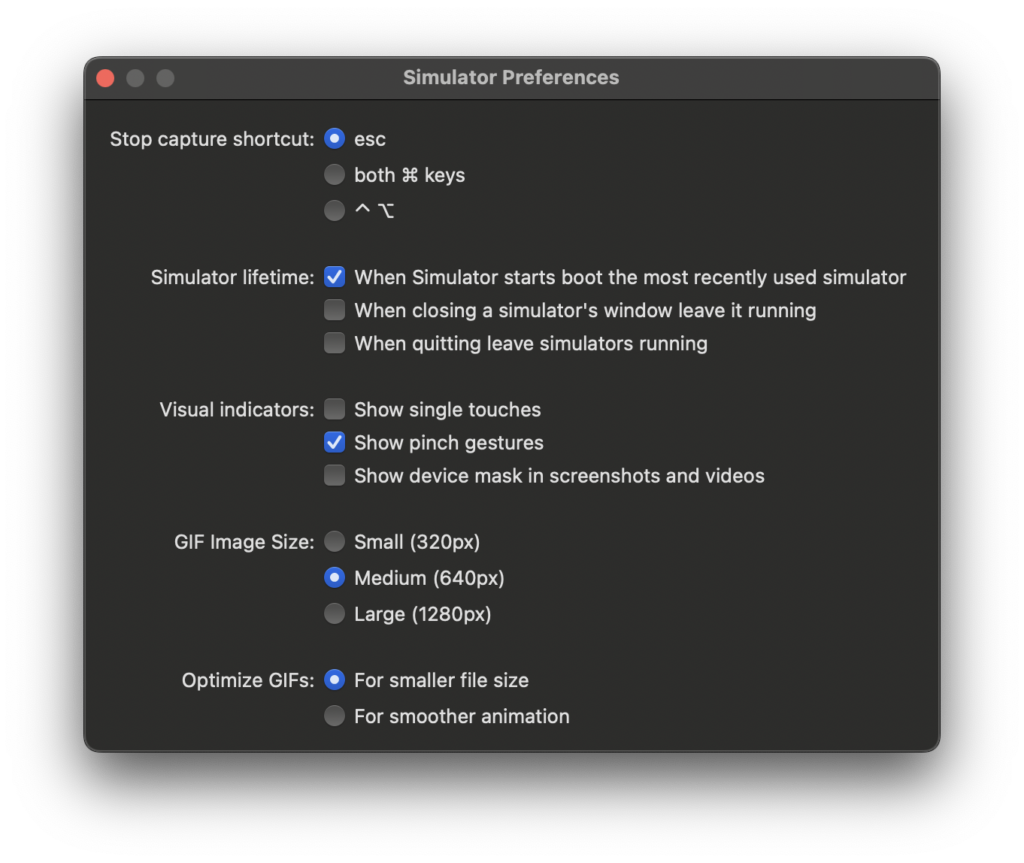
- Simulator Lifetime: Which controls what happens when you quit the simulator, close the window, or when it starts.
- Visual Indicators: The most useful one I use is “Show single touches” which shows where I’m tapping on the simulator and can be very useful if I’m presenting or capturing a screen recording of my app.
- GIF Size and Optimize GIFs: These options control the size of the GIF image and its animation optimization if you were to save that screen recording you captured as a GIF. For me personally, I never needed to change the default options as they seem to fit my needs.
I hope you found this post helpful, if you have any questions or more tips please feel free to leave a comment below, and don’t forget to share this post with your fellow developers!
Thanks and happy coding!
– Kais
Debug Info: Simulator Version 13.4.1 (977.2), SimulatorKit 618, CoreSimulator 802.6.1